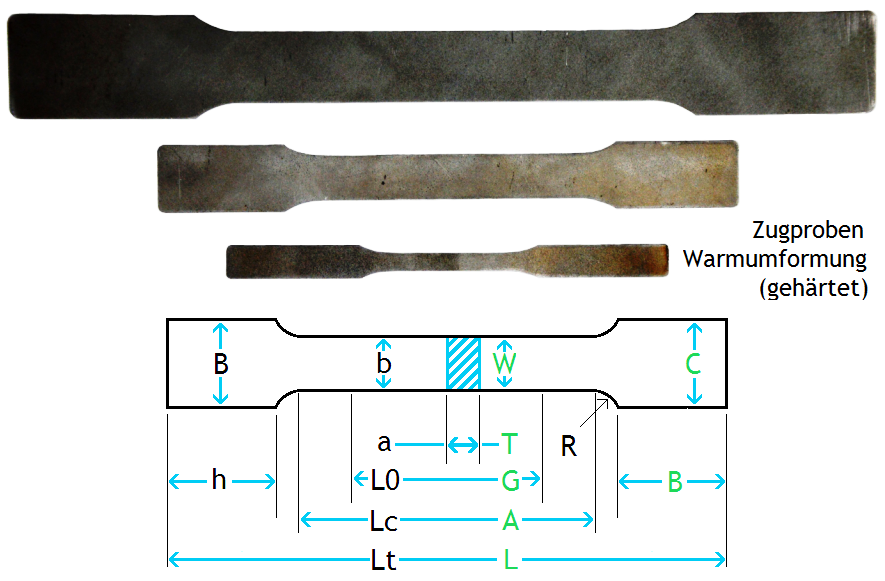
Typical specimen shapes according ISO6892 / ASTM A370 / GOST / JIS and other
Blechdicken 0,01 - 10,0 mm / Festigkeiten von 100 - 1700 MPa

designation | ISO6892 B1-1 | ISO6892 B1-2 | ISO6892 B1-3 | Press hardening | ASTM E8/E8M | ASTM E8/E8M | JIS | GOST | GOST | |
ISO | ASTM | |||||||||
Lt | L | 200 | 250 | 200 | ~136 | 200 (min.) | 100 | 200 |
| 151.2 |
B | C | 20 | 30 | 35 | 9 | 20 | 10 | 35 |
| 20 |
h | B | ~50 | ~50 | ~55 | 45 (min.~45) | ~50 min | ~30 | ~55 |
| ~40 |
R | R | 20 | 20 | 25 | 15 | 15 (min.12,5) | 15 (min.6) | 25 |
| 15 (min.6) |
Lc | A | 75 (min.57) | 120 (min.90) | 60 (min.) | 36 | 57 (min.) | 36 (min.32) | 60 |
| 36 |
L0 | G | 50 | 80 | 50 | 30 | 50 +1 | 25 +1 | 50 |
|
|
b0 | W | 12.5 +1 | 20 +1 | 25 +1 | 5 | 12,5+0,2 | 6+0,1 | 25 |
| 12,5 |
Lc Parallelität | 0,06 | 0,12 | 0,12 | 0,06 |
|
| 0,1 |
|
| |
b+ | please add additional with for grinding (10% of thickness of sheet metal - each side! | |||||||||
a0 | Thickness range can be blanked: 0,05 – 10 mm | |||||||||
special shape of tensile specimen on request / for to grind of cold hardened edge we recommend to use the specimen grinding machine PSM 2000
Sheet Metal Tensile Specimen Blanking Tools
All specimen punching tools will be designed to your special requirements. We are able to follow the standards according ISO6892 / ASTM A370 ...
or to customize according your special design.
A blanking tool in general should have an oversize at parallel length / gage length, also if you don't like to remove the damaged edges from punching now (cold hardened edges, compressed deformed material at the edges, micro cracks ...). You will see this necessity later on and you will start this improvement (by purchasing our unique tensile specimen grinding machine). If you didnt oversize your blanking tool it will be, that you are outside the dimensions of the standard. For example the ISO6892-1 allowes width b0 20 mm +/- 1 mm (19 - 21 mm). If your punching tool has a layout for only 20 mm and you will remove each side 0.6 mm your final specimen size b0 is only 18.8 mm (outside the norm).
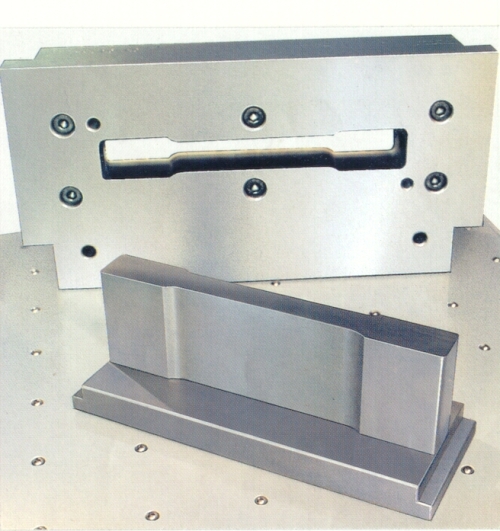
C-shape-blanking tool for sheet metal tensile specimen (changing tool)
Sheet metal tensile specimen blanking tool on roller desk

The punching die is dismenteled from guiding / stripper plate.
In upper part of the picture you can see the die plate from bottom side.
Also available different designs of blanking tools:
- extension to blank also sheet metal tensile secimens in direction 45°
- double tool with depth limiter (two specimen one behind the other)
- additional cirucular blank (zinc coating)
- spring loaded clamping plate for very thin sheet metal plates (0.05 - 0.3 mm)
- special dimensions (dfferent from standard)
- design for weak material like aluminium, copper ...
- design for hard cutting (hot deformed material) <1.600 MPa
- ... "everything is possible" - please send us your requirements schuetz(a)schuetz-licht.de
Sheet metal tensile specimen blanking tool for robot system SHOUGANG
C-shape-blanking die for to receive 4 specimens with one punch:
2 tensile specimens
1 circular
1 square
Sheet metal tensile specimen blanking tool for 3 specimens cutting direction longitudnal / traversal / diagonal
At this c-shape-blanking-tool you will receive with only one punch 3 tensile specimens. The direction of the cuts are longitudinal / traversal / diagonal (0 + 45 + 90°).